Class-Based Views vs. Function-Based Views in Django REST Framework
Web Development
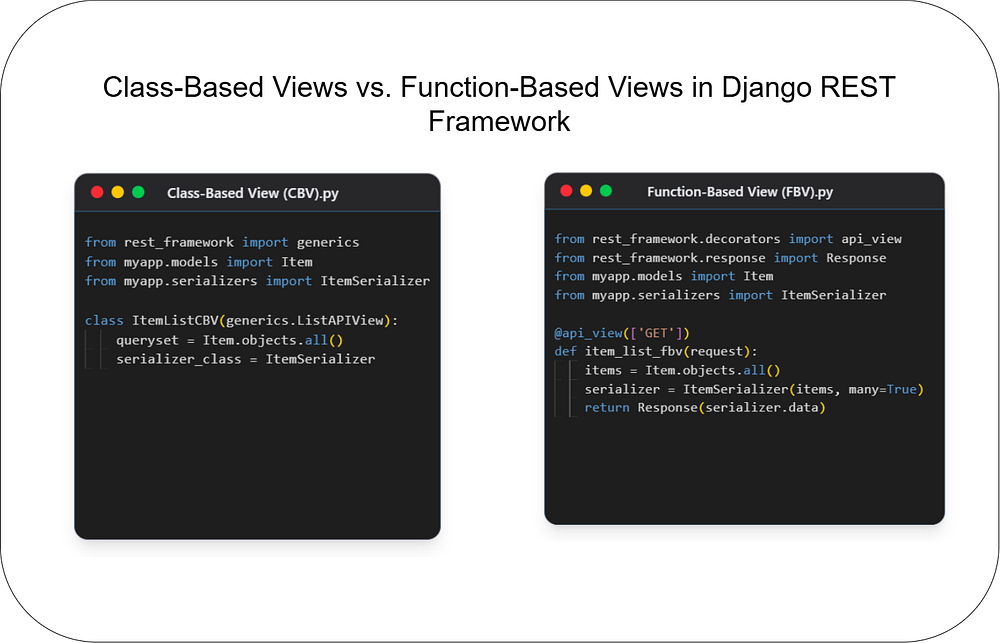
Choosing the right architecture for your API endpoints is crucial for building scalable and maintain...
123

gitandgithub
🚀 Are you new to Git and GitHub? Confused about version control, repositories, and commits? Don’t worry! This beginner-friendly guide will help you understand Git and GitHub step by step.
Whether you are a developer, student, or tech enthusiast, knowing Git and GitHub is a must! Let’s get started.
Git is a version control system that helps developers track changes in code, collaborate with others, and manage projects efficiently.
✅ Tracks code changes over time
✅ Allows multiple developers to collaborate
✅ Helps you recover previous versions of code
✅ Saves time and prevents code loss
Example: Imagine you are writing a document, and you accidentally delete a paragraph. Without Git, you cannot recover it. But with Git, you can restore previous versions easily!
GitHub is an online platform that allows developers to store their Git repositories in the cloud. It helps in:
✅ Hosting and sharing code
✅ Collaborating with teams
✅ Managing projects efficiently
Think of GitHub as Google Drive for code — it allows you to store, share, and collaborate with others!
Open your terminal (Command Prompt or Git Bash) and type:
git --versionIf Git is installed, you’ll see a version number. If not, follow the next step.
🔹 Windows: Download Git and install it.
🔹 Mac: Install Git using Homebrew:
brew install git🔹 Linux: Use the package manager:
sudo apt install git   # For Ubuntu/Debian
sudo yum install git # For CentOS/FedoraAfter installing Git, configure it with your name and email:
git config --global user.name "Your Name"
git config --global user.email "your-email@example.com"
🔹 Verify settings:
git config --listA repository (repo) is a folder that contains your project and tracks changes.
mkdir my_project      # Create a folder
cd my_project        # Navigate into the folder
git init             # Initialize Git in this folder
You will see a hidden .git folder inside — this is where Git tracks changes.
echo "Hello, Git!" > hello.txt  # Create a file
git status                      # Check file status
git add hello.txt                # Stage the file
git commit -m "Added hello.txt" # Commit changesgit logecho "New Line" >> hello.txt # Modify file
git add hello.txt # Stage changes
git commit -m "Updated hello.txt" # Commit🔹 Undo last commit but keep changes:
git reset --soft HEAD~1🔹 Undo last commit and remove changes:
git reset --hard HEAD~11️⃣ Go to GitHub
2️⃣ Sign up for a free account
3️⃣ Click on New Repository → Give it a name → Click Create
1️⃣ Copy the GitHub repository URL
2️⃣ Run these commands in your terminal:
git remote add origin https://github.com/yourusername/repository.git
git branch -M main
git push -u origin main
✅ Now your project is live on GitHub! 🎉
To download a project from GitHub:
git clone https://github.com/username/repository.git🔹 Navigate into the cloned folder:
cd repositoryA branch allows you to create a separate version of your code without affecting the main project.
git branch new-feature
git checkout new-feature  # Switch to the new branch
OR (Shortcut):
git checkout -b new-featuregit checkout main # Switch to main branch
git merge new-feature # Merge changes1️⃣ Fork a repository: Copy someone else’s repo to your GitHub
2️⃣ Clone it: Download it to your local system
3️⃣ Make changes
4️⃣ Push changes to your fork
5️⃣ Create a Pull Request (PR) on GitHub
6️⃣ Get reviewed and merged
If you need to save changes without committing, use stash:
git stash🔹 Restore stashed changes:
git stash popWhen working with teams, merge conflicts occur.
🔹 Steps to resolve:
1️⃣ Open the conflicted file
2️⃣ Look for <<<<<<<, =======, >>>>>>>
3️⃣ Edit the file and keep the correct code
4️⃣ Add and commit changes:
git add conflicted_file
git commit -m "Resolved merge conflict"✅ Commit Often: Small commits make tracking changes easier
✅ Write Meaningful Commit Messages: Explain what changed
✅ Use Branches: Work on features without affecting main
✅ Pull Before Push: Always update your local code before pushing
✅ Use .gitignore: Avoid committing unnecessary files
Git and GitHub are essential tools for developers! By mastering Git commands and using GitHub for collaboration, you can boost your productivity and work with teams efficiently.
🚀 Now it’s your turn! Try these commands on your own project and start using Git & GitHub like a pro!
🔔 Found this guide helpful? Share it with your friends and follow me for more tutorials! 🎉

Code. Write. Build. Explore. 💻✍️ Software developer by day, mechanical tinkerer by night. When I’m not shipping code or writing blogs, you’ll find me trekking up a mountain, whipping up a feast, or hitting the open road on two wheels. Life is better in high gear.
View more blogs by me CLICK HERE
Choosing the right architecture for your API endpoints is crucial for building scalable and maintain...

Unlock the power of React and Next.js! This guide clarifies their key differences, ideal use cases, ...

Master JavaScript with these 10 concise and powerful one-liners. Level up your coding skills with ef...
Subscribe to get the latest posts delivered to your inbox