
Tired of a Messy Downloads Folder? I Built a Python Script to Fix It Forever
Performance Optimization
We’ve all been there. You look at your Downloads folder and it’s a digital graveyard. PDFs mixed wit...
170

A sitemap is essential for SEO, helping search engines index your website efficiently. In this blog, we’ll explore how to create a dynamic sitemap in a Next.js project using Prisma to fetch URLs from a database.
Before getting started, ensure you have the following setup:
A Next.js project
Prisma configured with your database
Blog data stored in the database with slug and updatedAt fields
Make sure Prisma is installed in your project. If not, install it using:
npm install @prisma/clientIf Prisma isn’t initialized in your project, set it up using:
npx prisma initNext.js allows you to generate sitemaps dynamically by creating an API route or exporting an asynchronous function in the app/sitemap.ts file (if using Next.js App Router).
Here’s how you can create the dynamic sitemap function using Prisma:
import prisma from "@/lib/prisma";
export default async function sitemap() {
  // Fetch blog URLs from the database
  const blogPosts = await prisma.BlogPosts.findMany({
    select: { slug: true, updatedAt: true },
  });
console.log(blogPosts);

  // Convert blog data to sitemap format
  const blogSitemap = blogPosts.map((post) => ({
    url: `https://yourwebsite/blogs/${post.slug}`,
    lastModified: new Date(post.updatedAt || new Date()),
    changeFrequency: "weekly",
    priority: 0.5,
  }));
return [
    {
      url: "https://yourwebsite/",
      lastModified: new Date(),
      changeFrequency: "yearly",
      priority: 1,
    },
    {
      url: "https://yourwebsite/blogs",
      lastModified: new Date(),
      changeFrequency: "weekly",
      priority: 0.5,
    },
    ...blogSitemap,
  ];
}The prisma.BlogPosts.findMany() function retrieves all blog posts from the database, selecting the slug and updatedAt fields.
We map through the posts to generate URLs in sitemap format.
Additional pages (homepage, blogs page) are manually added with defined changeFrequency and priority values.
To make the sitemap available for search engines, modify the next.config.js file to define the sitemap route:
module.exports = {
  async rewrites() {
    return [
      {
        source: '/sitemap.xml',
        destination: '/api/sitemap',
      },
    ];
  },
};
Alternatively, create an API route at pages/api/sitemap.js (for Pages Router):
import sitemap from "../../sitemap";
export default async function handler(req, res) {
  const sitemapData = await sitemap();
  res.setHeader("Content-Type", "application/xml");
  res.write(generateSitemapXML(sitemapData));
  res.end();
}
function generateSitemapXML(pages) {
  return `<?xml version="1.0" encoding="UTF-8"?>
  <urlset xmlns="http://www.sitemaps.org/schemas/sitemap/0.9">
    ${pages
      .map(
        (page) => `
      <url>
        <loc>${page.url}</loc>
        <lastmod>${page.lastModified.toISOString()}</lastmod>
        <changefreq>${page.changeFrequency}</changefreq>
        <priority>${page.priority}</priority>
      </url>`
      )
      .join("")}
  </urlset>`;
}Once the sitemap is set up, deploy your Next.js application and check if the sitemap is accessible via https://yourwebsite.com/sitemap.xml.
You can also submit the sitemap URL to Google Search Console to improve indexing.
By implementing a dynamic sitemap in Next.js with Prisma, you ensure your website stays updated with the latest blog posts without manual intervention. This helps search engines index your content efficiently and improves SEO rankings.
🔥 Found this blog post helpful? 🔥
If you enjoyed this article and found it valuable, please show your support by clapping 👏 and subscribing to my blog for more in-depth insights on web development and Next.js!
Subscribe here: click me
Your encouragement helps me continue creating high-quality content that can assist you on your development journey. 🚀

Code. Write. Build. Explore. 💻✍️ Software developer by day, mechanical tinkerer by night. When I’m not shipping code or writing blogs, you’ll find me trekking up a mountain, whipping up a feast, or hitting the open road on two wheels. Life is better in high gear.
View more blogs by me CLICK HERE
We’ve all been there. You look at your Downloads folder and it’s a digital graveyard. PDFs mixed wit...
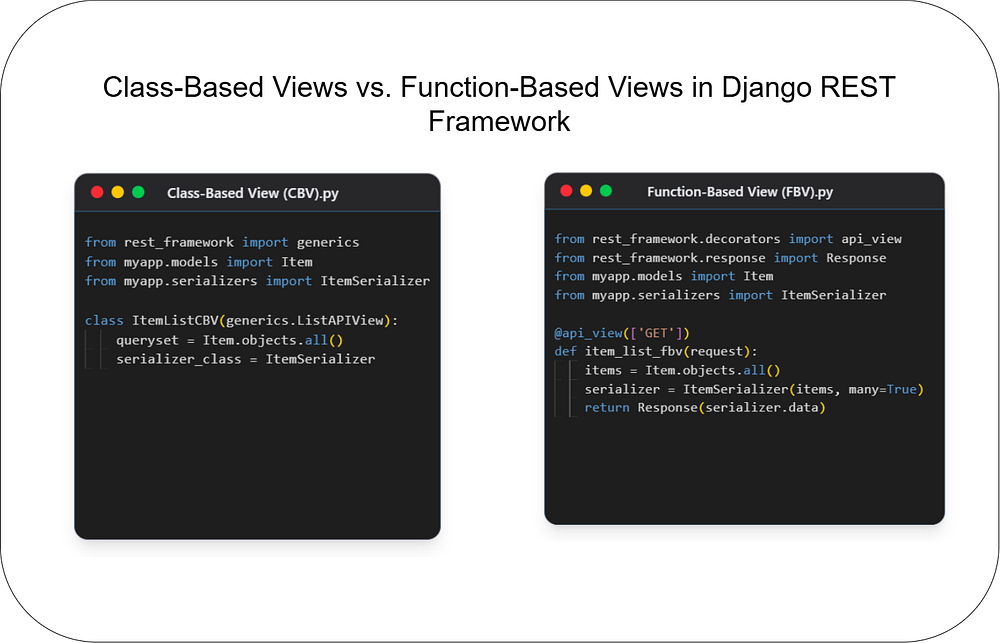
Choosing the right architecture for your API endpoints is crucial for building scalable and maintain...

Unlock the power of React and Next.js! This guide clarifies their key differences, ideal use cases, ...
Subscribe to get the latest posts delivered to your inbox