Class-Based Views vs. Function-Based Views in Django REST Framework
BackendWeb Development
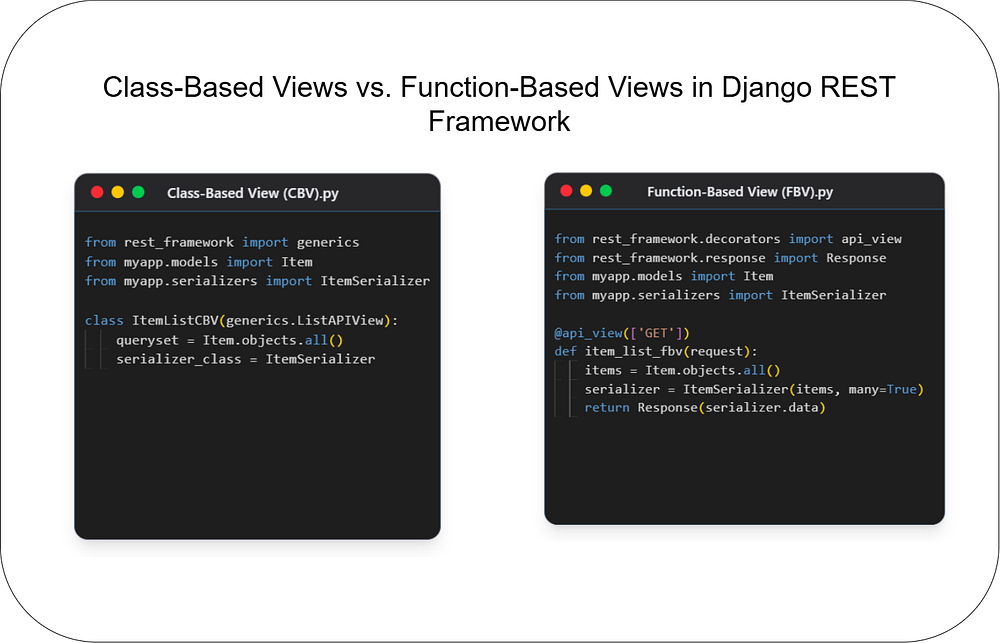
Choosing the right architecture for your API endpoints is crucial for building scalable and maintain...
123
Discover how to integrate Puppeteer with Next.js 15 for seamless PDF generation from HTML content. This tutorial covers setting up API routes, converting HTML to PDFs, and providing an easy way for users to download the generated documents.

To get started, install Puppeteer using the following command:
npm install puppeteerFor Next.js App Router (v14+), create a file in app/api/generate-pdf/route.js and add the following code:
import puppeteer from "puppeteer";

export async function POST(req) {
  try {
    const { htmlContent } = await req.json();

    // Launch Puppeteer in headless mode
    const browser = await puppeteer.launch({ headless: "new" });
    const page = await browser.newPage();

    // Set HTML content
    await page.setContent(htmlContent, { waitUntil: "domcontentloaded" });

    // Generate PDF
    const pdfBuffer = await page.pdf({ format: "A4", printBackground: true });

    await browser.close();

    return new Response(pdfBuffer, {
      headers: {
        "Content-Type": "application/pdf",
        "Content-Disposition": "attachment; filename=generated.pdf",
      },
    });
  } catch (error) {
    return new Response(JSON.stringify({ error: "PDF generation failed" }), {
      status: 500,
    });
  }
}
This API route:
Accepts htmlContent via a POST request.
Uses Puppeteer to render the HTML and generate a PDF.
Returns the generated PDF as a downloadable file.
Add a frontend React component to trigger the PDF generation and download it.
"use client";
import { useState } from "react";

export default function GeneratePDF() {
  const [loading, setLoading] = useState(false);

  const generatePDF = async () => {
    setLoading(true);
    const htmlContent = `<h1>Hello, PDF!</h1><p>This is a PDF generated from HTML.</p>`;

    const response = await fetch("/api/generate-pdf", {
      method: "POST",
      body: JSON.stringify({ htmlContent }),
      headers: {
        "Content-Type": "application/json",
      },
    });

    if (response.ok) {
      const blob = await response.blob();
      const url = window.URL.createObjectURL(blob);
      const link = document.createElement("a");
      link.href = url;
      link.download = "generated.pdf";
      document.body.appendChild(link);
      link.click();
      document.body.removeChild(link);
    } else {
      alert("Failed to generate PDF");
    }
    setLoading(false);
  };

  return (
    <div className="p-4">
      <button
        onClick={generatePDF}
        className="bg-blue-500 text-white px-4 py-2 rounded"
        disabled={loading}
      >
        {loading ? "Generating..." : "Download PDF"}
      </button>
    </div>
  );
}
npm run devIf you enjoyed this article and found it valuable, please show your support by clapping 👏 and subscribing to my blog for more in-depth insights on web development and Next.js!
Subscribe here: click me
Your encouragement helps me continue creating high-quality content that can assist you on your development journey. 🚀

Code. Write. Build. Explore. 💻✍️ Software developer by day, mechanical tinkerer by night. When I’m not shipping code or writing blogs, you’ll find me trekking up a mountain, whipping up a feast, or hitting the open road on two wheels. Life is better in high gear.
View more blogs by me CLICK HERE
Choosing the right architecture for your API endpoints is crucial for building scalable and maintain...

Unlock the power of React and Next.js! This guide clarifies their key differences, ideal use cases, ...

Master JavaScript with these 10 concise and powerful one-liners. Level up your coding skills with ef...
Subscribe to get the latest posts delivered to your inbox